


Creating a custom email signature in Outlook is an excellent way to personalize your emails and provide important information like your contact details, social media links, or company logo. The process to add a signature can vary slightly depending on whether you're using the desktop app, web version, or mobile app. Here's a detailed step-by-step guide for each version.
1. Adding a Signature in Outlook Desktop (Windows & Mac)
For Windows:
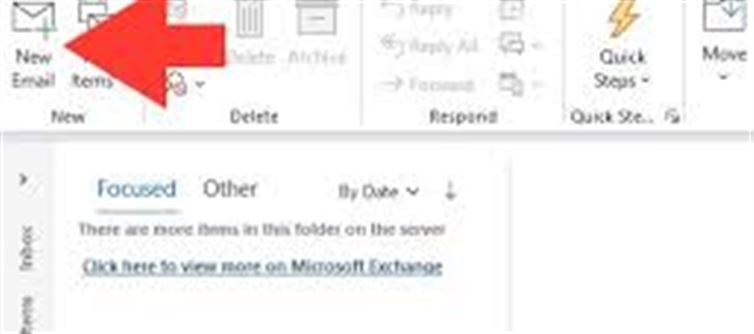
1. Open Outlook and go to the Home tab.
2. Click on New Email to open a new message window.
3. In the new message window, go to the Message tab and click on Signature (usually on the far-right of the ribbon).
4. Select Signatures from the dropdown list to open the Signatures and Stationery window.
5. Click on New to create a new signature.
o Enter a name for your signature (e.g., "Work Signature" or "Personal Signature").
6. In the Edit Signature box, type your desired signature. You can also use the toolbar to format the text, add hyperlinks, or insert images (like your company logo).
7. Under Choose default signature, select which signature to use for:
o New messages: The signature that will appear by default in your new emails.
o Replies/forwards: The signature that will appear when replying to or forwarding an email.
8. Click OK to save your signature.
Now, your signature will be automatically inserted into your emails based on your settings.
For Mac:
1. Open Outlook and click on Outlook in the top-left corner of your screen, then select Preferences.
2. In the Email section, select Signatures.
3. In the Signatures window, click the + button to create a new signature.
4. Name your signature and enter the text you want to include. You can format the text and add images or hyperlinks.
5. In the Default Signatures section, select your newly created signature for New messages and Replies/forwards.
6. Close the window to save your changes.
2. Adding a Signature in Outlook Web (Outlook.com)
If you're using Outlook Web, adding a signature is simple. Here’s how:
1. Go to Outlook.com and log in to your account.
2. Click on the gear icon in the top-right corner and select View all Outlook settings.
3. Under the Mail category, click on Compose and reply.
4. In the Email signature section, create your signature in the text box. You can format the text, add links, and even insert images using the toolbar.
5. You can also choose to automatically include the signature on new messages and when replying/forwarding.
6. After you’ve customized the signature, click Save.
Now your signature will automatically appear on your emails, or you can manually insert it in a new message.
3. Adding a Signature in the Outlook mobile App (iOS & Android)
Creating a signature on mobile is straightforward, but it’s a bit more limited than on desktop or web versions:
For iOS (iPhone/iPad):
1. Open the Outlook app on your iOS device.
2. Tap the profile icon (or the hamburger menu) in the top-left corner.
3. Scroll down and tap Settings (gear icon).
4. Scroll down to the Mail section and tap on Signature.
5. Enter the signature text you want to use. You can add basic text but cannot insert images or links.
6. Once you're done, tap Save.
For Android:
1. Open the Outlook app on your Android device.
2. Tap the profile icon (or menu icon) in the top-left corner.
3. Scroll down and select Settings.
4. Under the Mail section, tap Signature.
5. Enter your desired signature text and tap Save.
4. Tips for Creating an Effective Email Signature
· Keep It Simple: While it’s tempting to add multiple links and images, a cluttered signature can overwhelm your recipient. Stick to key details like your name, position, contact info, and company logo (if applicable).
· Use Links Wisely: You can add clickable links to your website, social media profiles, or portfolio. This helps keep your signature functional and engaging.
· Add Professional Formatting: Use consistent fonts, colors, and spacing to keep your signature looking professional.
· Test It: Always send a test email to yourself to see how your signature appears on both desktop and mobile devices. This helps ensure that everything is displayed correctly.
· Consider Legal and Compliance Information: If your company requires disclaimers, confidentiality notices, or specific legal text in email signatures, make sure to include them.
5. Troubleshooting Common Issues
· Images Not Showing: If your image doesn’t display in emails, it might not be embedded correctly. Ensure the image is hosted online (preferably on a server) and use an image link.
· Signature Not Appearing Automatically: Double-check your settings in Outlook to ensure the signature is set as your default for new emails or replies.
· Different Signatures on mobile and Desktop: Keep in mind that mobile signatures might have fewer formatting options, so make sure your signature looks good across platforms.
Conclusion
Creating and managing email signatures in Outlook is a simple yet powerful way to add a professional touch to your communications. Whether you're using Outlook Desktop, Web, or Mobile, you can easily customize your signature with text, images, and links. By following these simple steps, you'll ensure that your emails are always polished and consistent.
Disclaimer:
The views and opinions expressed in this article are those of the author and do not necessarily reflect the official policy or position of any agency, organization, employer, or company. All information provided is for general informational purposes only. While every effort has been made to ensure accuracy, we make no representations or warranties of any kind, express or implied, about the completeness, reliability, or suitability of the information contained herein. Readers are advised to verify facts and seek professional advice where necessary. Any reliance placed on such information is strictly at the reader’s own risk.
 click and follow Indiaherald WhatsApp channel