


A gas lighter is a kitchen essential. From lighting stoves to starting candles, it’s convenient and fast. But what happens when your lighter stops working? Instead of throwing it away or buying a new one, you can repair it at home in just a few minutes. Here’s a detailed guide to saving your lighter and money.
1. Why Does a Gas Lighter Stop Working?
Before jumping into repairs, it’s important to understand why your lighter malfunctions:
Dust and Dirt: Carbon and dust build up on the spark pin, preventing ignition.
Moisture: Keeping the lighter near the sink or in damp places can damage the internal mechanism.
Wear and Tear: Springs and buttons can jam or get loose with repeated use.
Loose Wires: The internal wire may disconnect, stopping the spark from reaching the pin.
Understanding the problem helps in applying the right fix quickly.
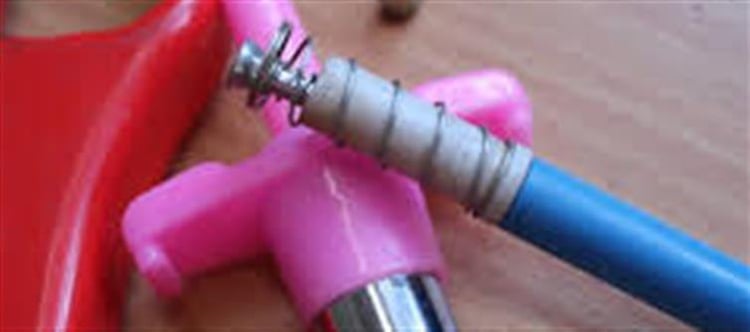
2. Clean the Spark Pin for Instant Fix
Often, a lighter doesn’t spark because the spark pin is dirty or clogged. Here’s how to fix it:
Open the lighter carefully.
Remove the spring inside if needed.
Use a pencil tip, pin, or small brush to remove carbon and dirt from the spark pin.
Test the lighter; it should spark instantly.
This simple cleaning is usually enough for minor malfunctions and keeps your lighter in working condition.
3. Fix Loose Internal Wires with Aluminum Foil
If the lighter still doesn’t work, a loose or cut internal wire might be the cause. You can repair it using aluminum foil:
Take a small piece of foil paper.
Insert it carefully to reconnect the internal wire to the spark pin.
Ensure it doesn’t touch other metal parts that could cause a short circuit.
Close the lighter and test it.
This trick restores the electrical connection, allowing the spark to reach the pin again.
4. Lubricate Springs and Buttons with Coconut Oil
Sometimes, the problem isn’t the spark but mechanical stiffness. Springs and buttons inside the lighter can jam, making it difficult to ignite. Here’s a safe solution:
Take some coconut oil, a natural lubricant you likely already have at home.
Use an old toothbrush to apply the oil gently on the springs and button mechanisms.
Move the button a few times to ensure smooth operation.
Test the lighter to see the improvement.
Lubrication keeps the moving parts flexible and prevents further jamming.
5. Tips to Maintain Your Gas Lighter
To prevent frequent repairs, follow these maintenance tips:
Keep It Dry: Avoid placing your lighter near sinks or damp areas.
Clean Regularly: Wipe off dust and food particles from the spark pin weekly.
Gentle Use: press the button gently and avoid excessive force on the spark mechanism.
Store Properly: Store your lighter upright in a dry, cool place.
By maintaining your lighter, you extend its lifespan and avoid unnecessary replacements.
6. Why Repairing Is Better Than Replacing
Repairing your gas lighter at home is:
Cost-Effective: Avoid spending ₹50-100 at a repair shop or buying a new lighter.
Eco-Friendly: Reduces plastic and metal waste in landfills.
Quick: Most fixes take less than 10 minutes.
Satisfying: Gives you a sense of accomplishment and self-reliance.
With a few simple household items like aluminum foil, coconut oil, and a pin, your lighter can work like new again.
Final Takeaway
A malfunctioning gas lighter is not the end of the road. With the right cleaning, lubrication, and minor repairs, you can restore its function quickly and safely. These simple hacks not only save money but also help reduce unnecessary waste, making your kitchen more sustainable and efficient.
.jpg)
 click and follow Indiaherald WhatsApp channel