


Paneer, also known as indian cottage cheese, is a staple in many indian households. Its mild flavor and firm yet soft texture make it a versatile ingredient in both savory and sweet dishes. While store-bought paneer is convenient, nothing compares to the freshness and purity of homemade paneer. Making paneer at home is surprisingly simple, requires minimal ingredients, and ensures a preservative-free, creamy result.
Why Make Paneer at Home?
Freshness and Purity: Homemade paneer is free from preservatives and artificial flavors.
Custom Texture: You can make it soft for desserts or firm for frying and curries.
Cost-Effective: Making paneer at home is cheaper than buying packaged paneer.
Versatility: Fresh paneer can be used in dishes like paneer tikka, palak paneer, paneer bhurji, and even desserts like rasgulla or sandesh.
Ingredients
To make fresh paneer, you will need:
- 1 liter full-fat milk (fresh is best)
- 2–3 tablespoons lemon juice or white vinegar (as a coagulant)
- A pinch of salt (optional)
- Cheesecloth or muslin cloth
Step-by-Step Method
1. Boil the Milk
- Pour the milk into a heavy-bottomed pan.
- Heat on medium flame, stirring occasionally to prevent it from sticking to the bottom.
- Bring it to a gentle boil.
2. Add the Coagulant
- Reduce the heat to low and gradually add lemon juice or vinegar, stirring gently.
- You will notice the milk curdling as the solids separate from the whey (clear liquid).
- If the milk does not curdle completely, add a little more lemon juice/vinegar.
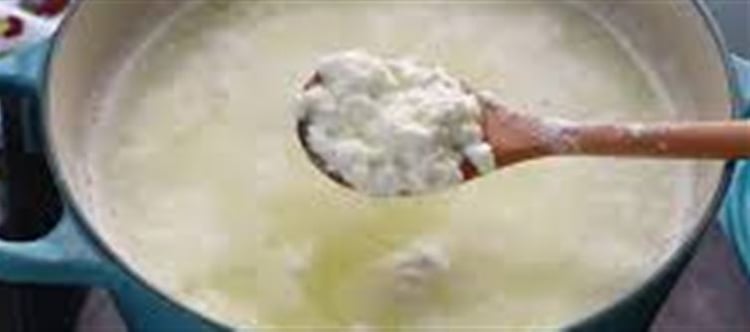
3. Strain the Curdled Milk
- Place a cheesecloth or muslin cloth over a colander.
- Pour the curdled milk into the cloth to separate the paneer from the whey.
- Rinse the paneer under cold water to remove the acidic taste of lemon or vinegar.
4. Drain Excess Water
- Gather the edges of the cloth and twist it to remove excess whey.
- For softer paneer, leave some moisture in. For firmer paneer, press it gently under a heavy object (like a pan filled with water) for 1–2 hours.
5. Cut and Store
- Remove the paneer from the cloth and cut it into cubes or slices.
- Store in an airtight container in the refrigerator for up to 3–4 days.
- Paneer can also be frozen for longer storage, though slight texture changes may occur.
Tips for Perfect Homemade Paneer
Use Full-Fat Milk: The higher fat content ensures creamier and richer paneer.
Avoid Overheating: Boiling milk at high heat can make paneer rubbery. Gentle heating is key.
Choose the Right Coagulant: Lemon juice gives a slightly tangy flavor, while vinegar is neutral. Yogurt can also be used for a softer texture.
Press According to Use: Light pressing is best for desserts; firm pressing is ideal for frying or grilling.
Experiment with Flavors: Add herbs or spices to the milk before curdling to create flavored paneer for special dishes.
Delicious Uses of Fresh Paneer
- Curries: Paneer butter masala, palak paneer, shahi paneer
- Snacks: Paneer tikka, paneer pakora, stuffed parathas
- Desserts: Rasgulla, sandesh, paneer kheer
- Salads & Wraps: Grilled paneer cubes add protein to fresh salads and wraps
Conclusion
Making paneer at home is simple, rewarding, and customizable. With just milk and a natural coagulant, you can enjoy fresh, soft, and creamy paneer that elevates any dish. Once you master the basic steps, you can experiment with textures, flavors, and recipes, turning this humble ingredient into the star of your kitchen.
Disclaimer:
The views and opinions expressed in this article are those of the author and do not necessarily reflect the official policy or position of any agency, organization, employer, or company. All information provided is for general informational purposes only. While every effort has been made to ensure accuracy, we make no representations or warranties of any kind, express or implied, about the completeness, reliability, or suitability of the information contained herein. Readers are advised to verify facts and seek professional advice where necessary. Any reliance placed on such information is strictly at the reader’s own risk.
 click and follow Indiaherald WhatsApp channel