


Contouring can seem like a makeup mystery reserved for professionals, but with the right techniques and products, anyone can master it — no matter their skill level. Contouring isn’t about transforming your face, but enhancing and accentuating your natural bone structure. Whether you’re aiming for sharp cheekbones, a slimmer nose, or a more defined jawline, contouring can be a great tool to help highlight your features.
Here’s a beginner-friendly guide to contouring every face shape perfectly, with tips that anyone can follow!
1. Understand Your Face Shape
The first step in contouring is identifying your face shape. Knowing your face shape will help you apply contour in the most flattering way. The common face shapes are:
· Oval: Balanced proportions, slightly wider at the cheekbones and narrow at the chin.
· Round: Equal width and height, with full cheeks and a rounded chin.
· Square: Strong jawline with a squared-off chin, and the forehead, cheekbones, and jaw are all roughly the same width.
· Heart: A wider forehead and narrow chin.
· Diamond: High cheekbones, narrow forehead and chin, and sharp angles.
2. Basic Contouring Tools You Need
For beginner contouring, you don’t need to overcomplicate things. Keep it simple with these basic tools:
· Contouring powder/cream: Pick a contour shade that’s 2-3 shades darker than your natural skin tone.
· Highlighter: Choose a highlighter that’s 1-2 shades lighter than your natural skin tone to brighten the high points of your face.
· Contour brush or sponge: A flat brush or a makeup sponge is great for blending your contour and highlighter seamlessly into the skin.
· Blush: A blush in your preferred shade will help add a natural flush of color to your cheeks.
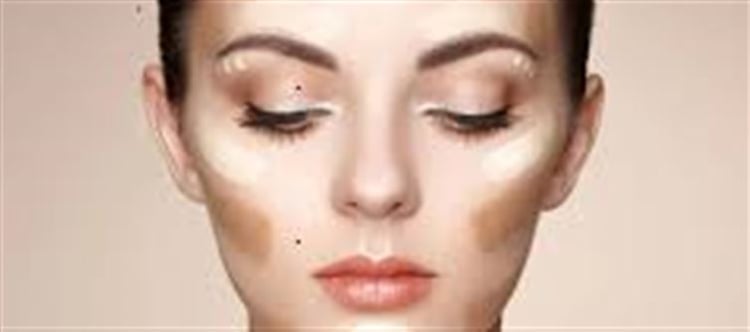
3. The Basic Contouring Technique
Even beginners can get the hang of contouring with this easy-to-follow method. The general steps are:
1. Highlight: Apply the highlighter to the high points of your face to bring attention to those areas. These include the tops of your cheekbones, the bridge of your nose, the center of your forehead, and your cupid’s bow.
2. Contour: Apply the contour product along the natural shadows of your face to create definition. The typical areas to contour are under your cheekbones, along your jawline, and the sides of your nose.
3. Blend: Blending is crucial! Use a damp beauty sponge or a blending brush to make sure your contour and highlighter are seamlessly blended into your skin. Harsh lines will defeat the purpose of contouring, so take your time to blend everything well.
4. Contouring Tips for Different Face Shapes
Now, let’s break down contouring for different face shapes:
Oval Face Shape:
An oval face has balanced proportions, so the goal is to enhance natural features. You want to define your cheekbones and jawline.
· Contour: Lightly contour under the cheekbones to add depth and along the sides of the forehead to create the illusion of a slightly smaller forehead.
· Highlight: Highlight the center of your forehead, under the eyes, and down the bridge of your nose.
· Blush: Apply blush slightly above the cheekbones, not directly on them.
Round Face Shape:
For round faces, the goal is to elongate and define the face, creating the illusion of more angles.
· Contour: Apply contour along your cheekbones, jawline, and temples. A strong contour along the sides of your forehead will help make your face appear more oval.
· Highlight: Highlight the center of your forehead, down the nose, and the tops of your cheekbones.
· Blush: Apply blush slightly higher than your natural cheekbones to lift the face.
Square Face Shape:
With a square face, you want to soften the strong angles of your jawline and emphasize the cheekbones.
· Contour: Focus on contouring the jawline and temples to soften the sharp angles. A subtle contour on the sides of the forehead can also help.
· Highlight: Highlight the center of the forehead and the tops of your cheekbones.
· Blush: Apply blush along the cheekbones, blending towards the temples.
Heart Face Shape:
For a heart-shaped face, contouring can help balance a wider forehead and narrow chin.
· Contour: Focus on contouring along the sides of the forehead to narrow it and on the jawline to balance the chin. A light contour on the sides of the nose can also help.
· Highlight: Highlight the center of the forehead, the tops of the cheekbones, and the chin.
· Blush: Apply blush to the apples of your cheeks and blend upwards towards your temples.
Diamond Face Shape:
Diamond faces have high cheekbones and a narrow forehead and chin. Contouring helps soften sharp angles and add balance.
· Contour: Contour the forehead and chin to narrow them slightly, while focusing on the hollows of the cheeks to soften them.
· Highlight: Highlight the tops of your cheekbones, the center of your forehead, and down the nose.
· Blush: Apply blush on the apples of the cheeks, blending it upwards toward the temples.
5. Don’t Forget to Blend, Blend, Blend!
The most important step in contouring is blending. No matter what face shape you have or what products you’re using, blending is what will make or break your look. After applying contour and highlighter, use a damp beauty sponge or a soft brush to blend everything into your skin for a seamless, natural finish.
6. Additional Contouring Tips for Beginners
· Start light: If you’re unsure about how much product to apply, start with a light hand. You can always build up the contour, but it’s harder to take it away once it’s applied.
· Use a light hand with your highlighter: Over-highlighting can make the skin look oily, so use just a little on the high points of your face.
· Focus on your natural features: Contouring isn’t about drastically changing your face shape. It’s about enhancing the features you already love!
Conclusion
Contouring might seem intimidating at first, but with these beginner-friendly tips, you can enhance your face shape effortlessly. Whether you have a round, oval, square, heart, or diamond-shaped face, contouring can be customized to suit your unique features. The key is to experiment with different techniques, find what works for you, and practice blending until you’re comfortable with your look. Happy contouring!
Disclaimer:
The views and opinions expressed in this article are those of the author and do not necessarily reflect the official policy or position of any agency, organization, employer, or company. All information provided is for general informational purposes only. While every effort has been made to ensure accuracy, we make no representations or warranties of any kind, express or implied, about the completeness, reliability, or suitability of the information contained herein. Readers are advised to verify facts and seek professional advice where necessary. Any reliance placed on such information is strictly at the reader’s own risk.
.jpg)
 click and follow Indiaherald WhatsApp channel